
- Why GemPages Users Should Add Shoppable Video
- How the Moast and GemPages Integration Works
- Step 1: Create Your Widget in Moast
- Step 2: Copy the Liquid Embed Code
- Step 3: Add the Widget to Your GemPages Page
- Step 4: Publish and Verify
- How to Add Shoppable Video to GemPages Product Pages
- Which Moast Widget Type to Use in GemPages
- Getting the Most From Moast on GemPages Pages
- Frequently Asked Questions
You've built a high-converting page in GemPages. Here's how to add shoppable video to it in under five minutes — and why it's one of the highest-impact additions you can make to any GemPages layout.
Why GemPages Users Should Add Shoppable Video
GemPages has helped create over 1,800,000 pages for 165,000+ Shopify merchants. The brands building on GemPages are, by definition, serious about conversion. GemPages is used specifically because Shopify's native theme editor isn't powerful enough — brands need more control over layout, CRO elements, A/B testing, and page-level conversion optimisation. That same conversion-focused mindset is exactly what makes adding shoppable video to GemPages pages such a natural fit.
Static pages, however well-designed, have a ceiling. But no amount of design polish replaces the conversion impact of authentic video. Moast merchants see an average 17% lift in conversion rate after adding shoppable video above the reviews section on their product pages. Dame, a wellness brand, added $26,000 in monthly revenue after placing existing social video on their PDPs without increasing traffic. ThruDark generated $5,854 in attributable sales in 30 days from a shoppable carousel placed in the same position.
For GemPages users running paid traffic to campaign pages, product pages, and landing pages, that kind of conversion lift compounds directly into ROAS. Every dollar spent driving traffic to a GemPages page with shoppable video works harder than every dollar spent driving traffic to the same page without it.
The other reason Moast pairs particularly well with GemPages: both apps are built around the same principle. GemPages gives you precise control over page design. Moast gives you precise control over which video content appears where and in what format. The combination produces exactly what high-converting Shopify stores need: pages that look exactly right and convert visitors at the highest possible rate.
How the Moast and GemPages Integration Works
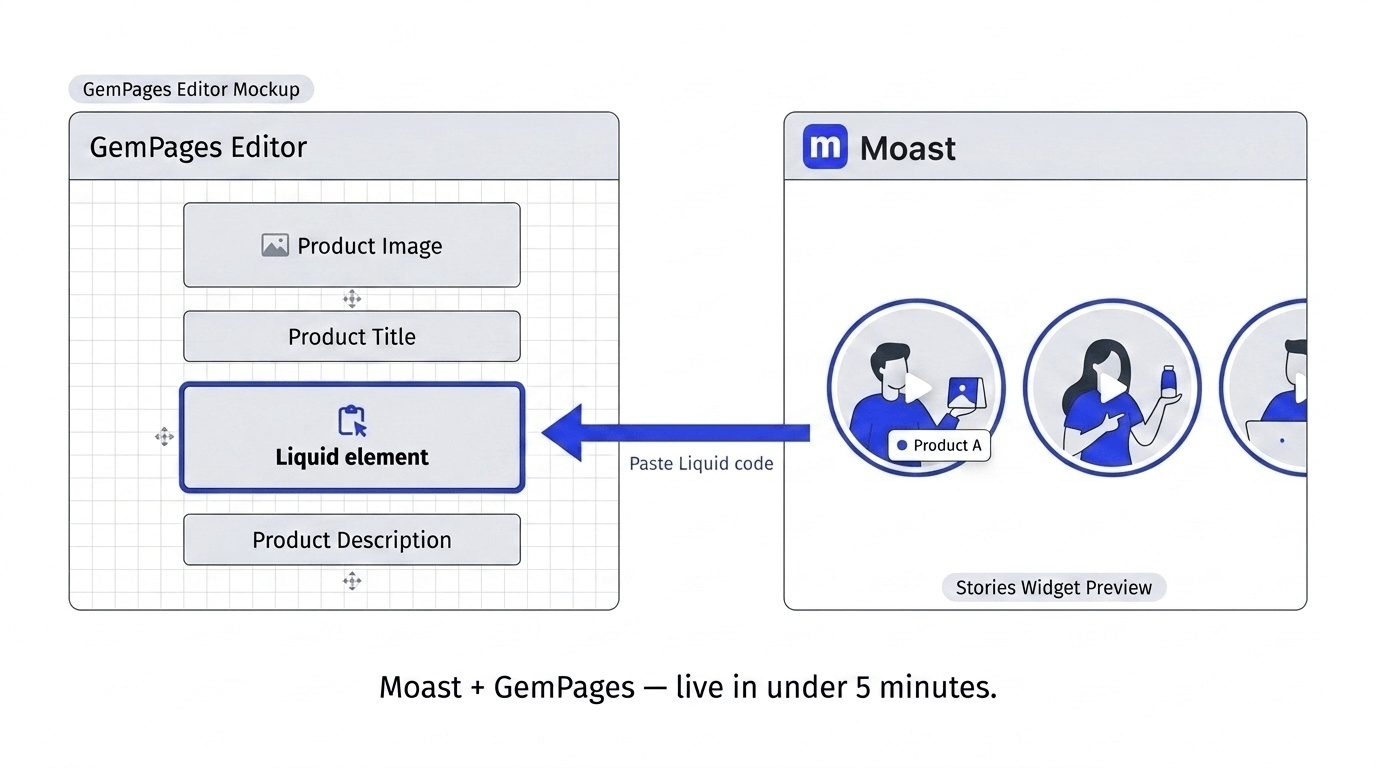
Moast integrates with GemPages through GemPages' native Liquid or Custom Code element — a standard element available in every GemPages page. No third-party connector, no API key, and no developer work is required.
The workflow is simple:
- Build and configure your Moast widget in the Moast app
- Copy the Liquid embed code from the widget builder
- Paste it into a Liquid or Custom Code element in GemPages
- Publish the page
Once published, the Moast widget renders on your GemPages page exactly as it does anywhere else on your Shopify store — full shoppable functionality, product tags, analytics, and Smart Auto-Match all working natively.
For product pages specifically, Smart Auto-Match means you only need to set up the integration once. After that, every time you tag a video with a product in Moast, that video automatically appears on the matching GemPages product page without any additional editing or re-publishing.
Step 1: Create Your Widget in Moast
Before touching GemPages, configure your widget in the Moast app. This is where you choose the widget format, design, and the content it will display.
- Open the Moast app from your Shopify admin
- Go to Widgets in the left navigation
- Click an existing widget or click Create widget to build a new one
- Choose your widget type
- Configure the widget settings: select which videos to show, set design options, and choose the page type
- Click Save
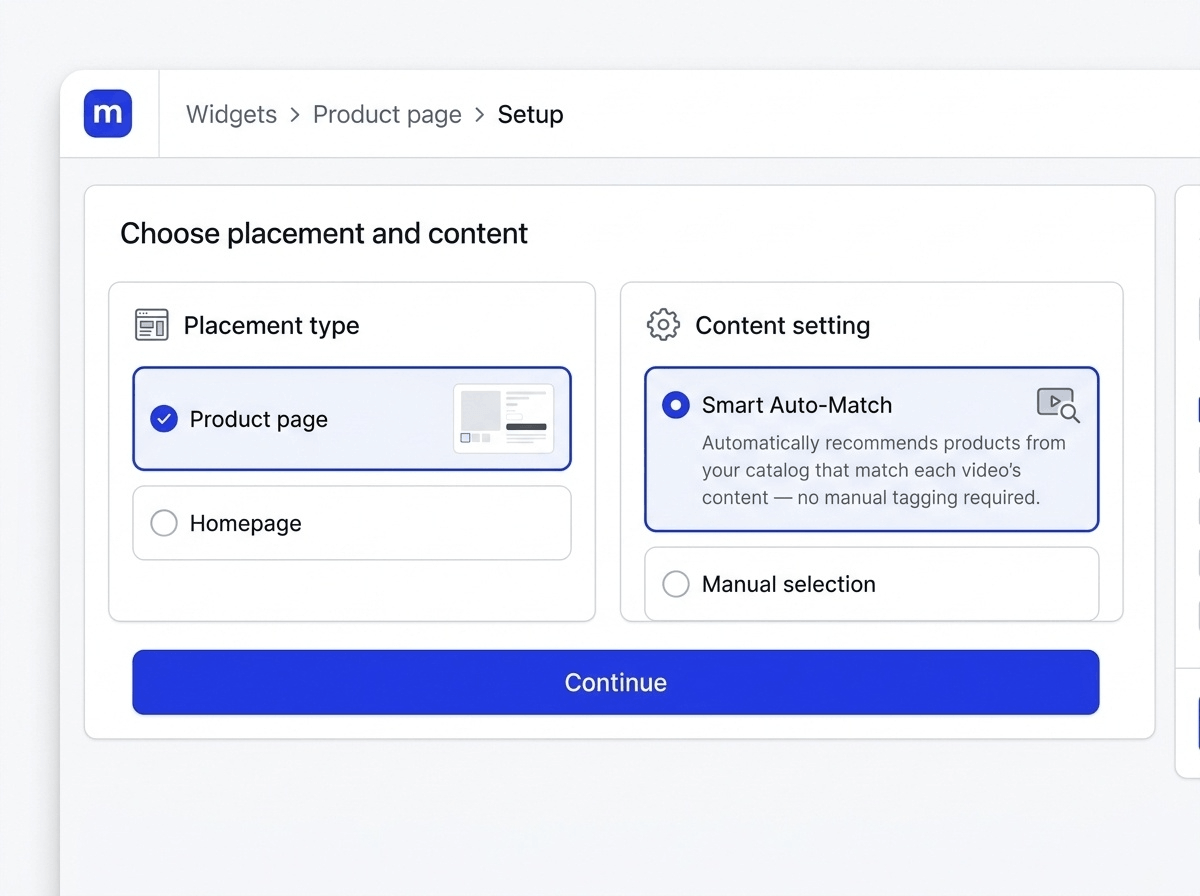
For GemPages product pages, select Product page as the page type and choose Smart Auto-Match when prompted. This tells Moast to detect which product page a visitor is viewing and show only the videos tagged for that product automatically.
Step 2: Copy the Liquid Embed Code
Once your widget is saved:
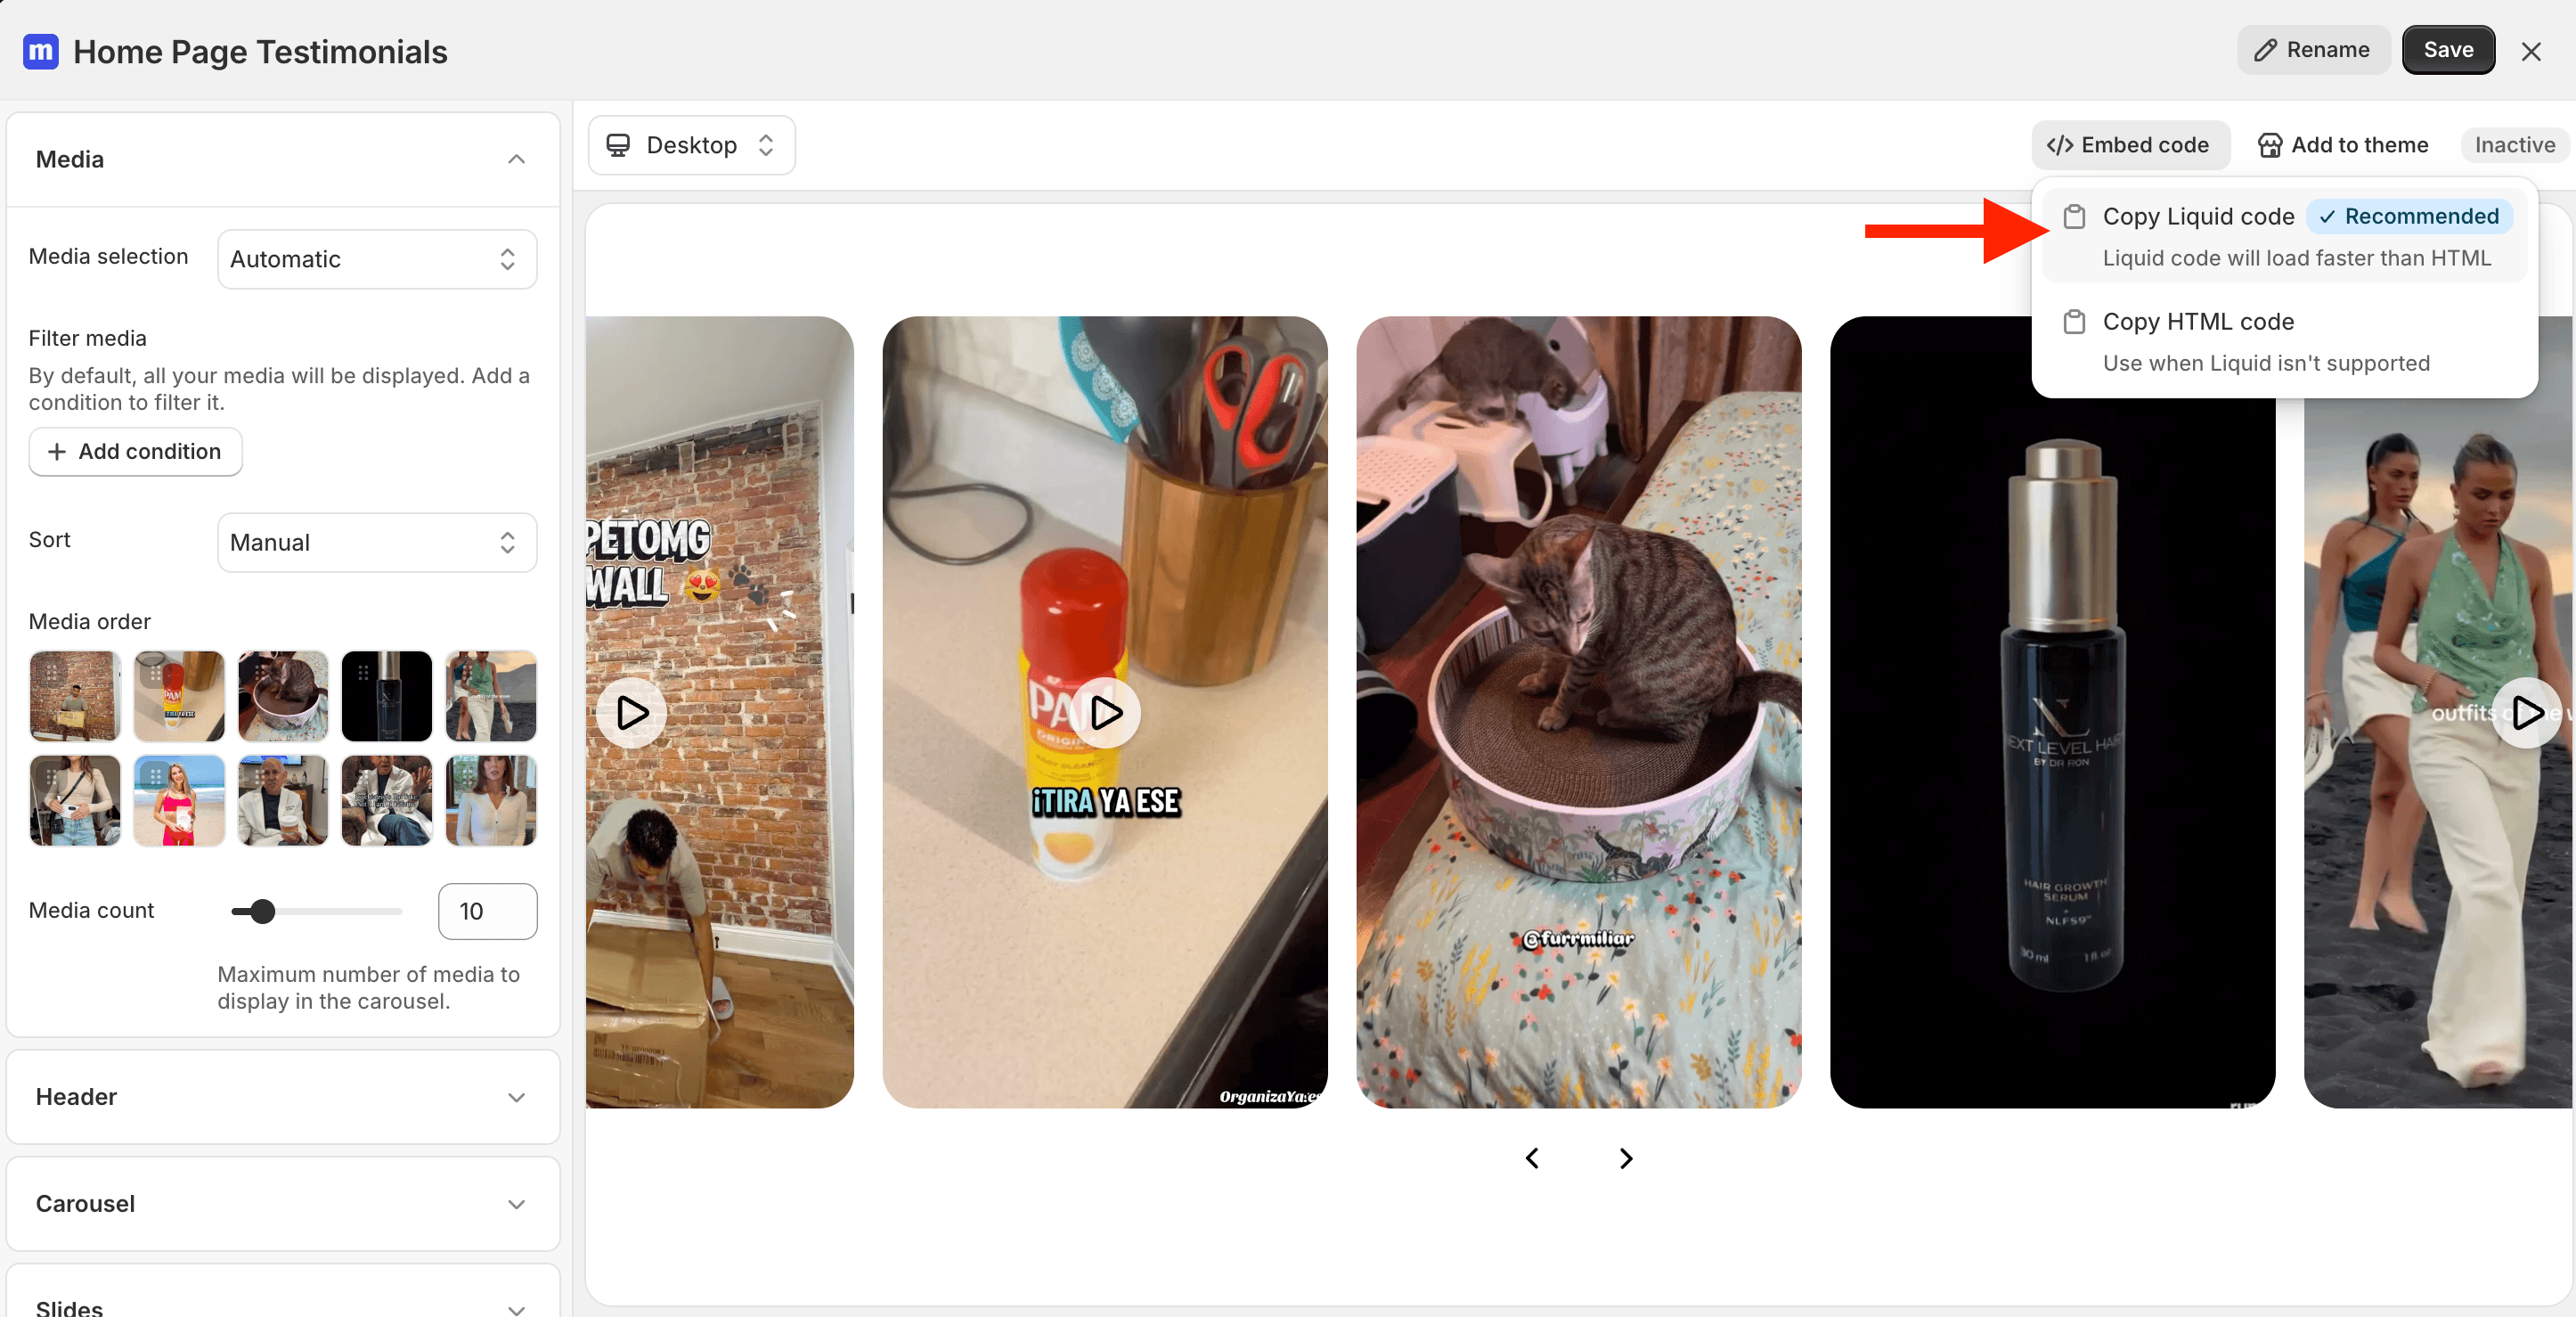
- Inside the widget builder, click Embed code in the top right corner
- Click Copy Liquid Code
Keep this copied. You will paste it directly into GemPages in the next step.
Liquid vs Custom Code in GemPages: GemPages offers both a Liquid element and a Custom Code element. Either works for Moast, but the Liquid element is the preferred option wherever possible. Moast's Liquid code is designed to render natively within Shopify's Liquid template engine, which is what GemPages uses under the hood. If you find the Liquid element isn't available on a specific page type in your GemPages plan, the Custom Code element works as a reliable fallback.
Step 3: Add the Widget to Your GemPages Page
With your Liquid code copied, open your page in the GemPages editor:
- Open the left sidebar in the GemPages editor
- Search for Liquid or Custom Code in the elements panel
- Drag the Liquid (or Custom Code) element onto your page and position it where you want the Moast widget to appear
- Right-click the element and select Edit Code, or click the pencil icon that appears when the element is selected
- Paste your copied Moast Liquid code into the code editor
- Click Save
Where to place it on the page: For GemPages product pages, position the element directly above your reviews section. This is the highest-converting placement for shoppable video on a product page — it catches shoppers at the exact moment they're looking for social proof before deciding to buy. For GemPages landing pages and campaign pages, position the widget below your hero section or alongside a testimonials block, where shoppers are in consideration mode and video social proof lands hardest.
For more detail on the GemPages Custom Code and Liquid element, GemPages has documentation here.
Step 4: Publish and Verify
After saving the element in the GemPages editor, click Publish in the top right corner to push the change live.
One important note: some widget settings and JavaScript-dependent features may not render correctly inside the GemPages editor preview. This is a known behaviour of how GemPages handles external scripts in the editor environment, not an issue with the Moast widget itself. Always verify on the published page, not just in the editor.
Before confirming the integration is working correctly:
- Check on desktop first. Open the published page URL in a browser tab and confirm the Moast widget is rendering, videos are playing, and product tags are visible and tappable.
- Check on mobile. The majority of Shopify traffic is mobile, and the widget should render correctly on a phone before you're satisfied. Open the page on your phone and confirm the widget isn't obscuring the add-to-cart button or any other primary CTA element on the page.
- Tap a product tag. Click or tap through one of the product tags in the widget to confirm it opens the correct product page and that the add-to-cart flow is working as expected.
How to Add Shoppable Video to GemPages Product Pages
If you're adding Moast to a GemPages product page template rather than a standalone landing page, the setup process is slightly different and significantly more scalable.
The key feature is Smart Auto-Match. Rather than creating a separate widget for each product and embedding it individually, you create one Product Page widget in Moast with Smart Auto-Match enabled. Moast then detects which product page a visitor is viewing and displays only the videos tagged for that specific product.
Setup for GemPages product pages:
- In Moast, go to Widgets and click Create widget
- Under page type, select Product page
- When prompted for content settings, select Smart Auto-Match
- Complete the widget configuration and save
- Copy the Liquid embed code
- In GemPages, open your product page template
- Add a Liquid or Custom Code element above the reviews section
- Paste the Liquid code and save
- Publish the template
Once this is in place, you never need to update the GemPages template again. Adding a new video in Moast and tagging it with a product automatically makes that video appear on the correct GemPages product page. The GemPages template handles the layout; Moast handles the content. Both update independently without requiring any re-publishing.
Which Moast Widget Type to Use in GemPages
- Stories widget — recommended for product pages. The circular story-bubble format that expands into a full-screen vertical video when tapped. Familiar, mobile-native, and the highest-converting format for product page placement. Shoppers engage voluntarily and, when they do, they're in an immersive experience with your product. Place above the reviews section on GemPages product pages.
- Video carousel — recommended for landing pages and homepage sections. A horizontal row of scrollable video thumbnails. Works well on GemPages landing pages where you want to showcase multiple customer testimonials or product demo videos side by side. Also effective on homepage sections and long-form campaign pages.
- Floating bubble — recommended for long GemPages pages. A persistent floating widget that follows shoppers as they scroll. Useful on long-form advertorial pages, editorial landing pages, or any GemPages layout where a visitor might scroll significantly before reaching a purchase decision point.
- Featured video — recommended for single-video hero sections. A large, single-video placement. Good for GemPages campaign pages with one strong piece of anchor content, such as a founder story or a hero customer testimonial.
For most GemPages product page implementations, start with the stories widget above the reviews section. For dedicated campaign or landing pages, a carousel tends to perform best when you have multiple pieces of content to showcase.
Getting the Most From Moast on GemPages Pages
- Tag products before publishing. Every video in your Moast widget should have a product tag applied before the page goes live. Without a product tag, a video is content. With one, it's a direct conversion tool — a single tap takes a viewer from watching to adding to cart. Tagging takes under a minute per video and is what makes the widget shoppable rather than decorative.
- Import your best-performing social content. The most persuasive content for any GemPages page is authentic customer and creator video. Import TikTok and Instagram Reels directly by pasting a URL — no downloading, no re-uploading. Use Import by Profile Mentions to surface content from customers who've already posted about your products.
- Use Social Sync to keep content fresh. Social Sync automatically imports new TikTok and Instagram content from connected accounts every 24 hours. For GemPages landing pages running paid traffic, rotating fresh video content over time means returning visitors always see something new. For more on how Social Sync works alongside a broader UGC strategy, see our guide to using UGC video to boost Shopify sales.
- Match widget styling to your GemPages design. Moast widgets support custom CSS and design configuration. Take a few minutes to align the widget's font, border radius, and accent colours with your GemPages page's design system. A widget that feels native to the page converts better than one that looks like a third-party embed.
- Combine with GemPages A/B testing. GemPages has built-in A/B testing, which is one of its strongest features for CRO-focused teams. You can test widget placement, widget type, and the presence of video vs no video, then measure the direct impact on conversion rate using both GemPages test results and Moast's per-widget analytics.
- Place video at the moment shoppers are deciding, not before. The most common GemPages implementation mistake is placing a video carousel at the top of the page where it competes with the hero section. The highest-converting position is above the reviews section on product pages or alongside a social proof block on landing pages. For the full breakdown, see our guide to increasing Shopify PDP revenue with shoppable video.
Frequently Asked Questions
Does Moast work with GemPages?
Yes. Moast integrates with GemPages through GemPages' native Liquid or Custom Code element. You copy the Liquid embed code from the Moast widget builder and paste it into a Liquid or Custom Code element on your GemPages page. No third-party connector or developer work is required. Once published, the Moast widget renders with full shoppable functionality, product tags, and analytics.
Do I need a developer to add Moast to GemPages?
No. The entire integration is done through the GemPages drag-and-drop editor and a Liquid code paste. If you're comfortable adding and editing elements in GemPages, you can add Moast without any developer involvement.
Why isn't the Moast widget displaying correctly in the GemPages editor?
Some JavaScript-dependent features may not render inside the GemPages editor preview. This is a known GemPages editor behaviour and does not mean the widget is broken. Always check the widget on the published page rather than relying on the editor preview. It will display and function correctly on the live page.
Do I need to update my GemPages page every time I add new videos in Moast?
No — if you set up your widget using Smart Auto-Match on a Product Page widget, you never need to update the GemPages template again. Every time you tag a new video with a product in Moast, it automatically appears on the matching GemPages product page. The embed code stays the same; the content updates dynamically.
Which Moast widget type works best in GemPages?
For product pages, the stories widget placed above the reviews section is the highest-converting format. For landing pages, a video carousel performs best when you have multiple testimonials or demo videos to show. For long advertorial or editorial pages, a floating bubble widget keeps video accessible throughout the scroll.
Can I use Moast on any type of GemPages page?
Yes. The integration works the same way across product pages, collection pages, landing pages, campaign pages, and any other page type built in GemPages. For product pages, use a Product Page widget with Smart Auto-Match. For all other page types, use whichever Moast widget format best suits your content and layout goals.
Where should I place the Moast widget on a GemPages landing page?
On a dedicated landing page, place the widget below your hero section and product benefit introduction, typically alongside or just above a social proof or testimonials block. This positions video at the moment a shopper has understood the product's value but hasn't yet committed to the CTA. On a GemPages product page, place it directly above the reviews section for the strongest conversion impact.
Adding shoppable video to your GemPages pages is one of the fastest ways to improve the conversion rate of pages you've already invested time and budget building. The integration takes under five minutes, requires no code, and starts working the moment the page is published.
If you need help with the Moast and GemPages setup, use the chat bubble in the bottom right of the Moast app and the team will walk you through it.
Get started with Moast for free
Related reading: How to add shoppable video to your Replo pages on Shopify · How to import TikTok and Instagram Reels into Shopify · Does shoppable video actually increase conversions?
Related content
.jpg)
.jpg)

Turn your social content into a revenue channel
Turn your TikToks and Reels into shoppable videos and boost conversions by 3.5x.